
If you have not connected your Facebook/messenger account yet, check Facebook & Instagram and Connecting Facebook & Instagram in the Integration Section to learn more about how to connect your Facebook/messenger.
Once you are fully connected, your Facebook&Instagram integration should look like this.

Creating Facebook Messages

Once you are connected, you can start replying to any message that comes from this selected Page. Sending a FB message is as simple as sending an SMS. There is nothing needed other than replying to messages from your FB messenger itself!
Message Source

When a message notification comes in, you can see which platform the message came from here especially if you have a lot of communication platforms linked to your account.
Adding Files to FB Message

You can add files and images to text messages by clicking this button and selecting the files from your computer.
Adding Emojis to FB Messages

You can add some flare to your text messages with emojis by clicking here! ????
Using SMS Templates

You can also use the SMS templates created in your CRM to cut down on response times. These templates are usually best suited for communications that are common or frequently asked.
Request Payment via FB Message

You can now request payments from your customers or leads right from the conversations section of your CRM! Simply click this button and fill out the information in the pop-up to request payments!
Collapse Message Box

If you'd like to collapse this message box, you can simply click this icon.
Mark As Starred / Unstarred
You can Mark the chat as Starred here or mark it as Unstarred.
Mark As Read /Unread

You can Mark the chat as Read here or mark it as Unread.
Delete

You can delete the client's chat here
Here you can access the client's details and also edit the settings.

- Full Name
The client's name will be displayed here. - Assigned User
****Here you will see the user assigned to this contact. - Phone Number
****If the client's phone number wasn't included with their info when they messaged, you can request it via chat and input it manually. - Email
****You can also input the client's email address here.
Add Tags

You can add tags to your client's info here
DND

To enable the "Do Not Disturb" option, click the "Configure" button to select the platforms you will be disconnecting the client from.
Active Campaign/Workflow


Add the client to an active campaign by clicking on the "+ add" button and selecting the campaign/workflow to which you would like to add them. You will also choose the event start date and time to run the campaign.
Create Opportunity
You can add the client to an opportunity here, just input the necessary info and click the "Add" button to save it.
Book Appointment
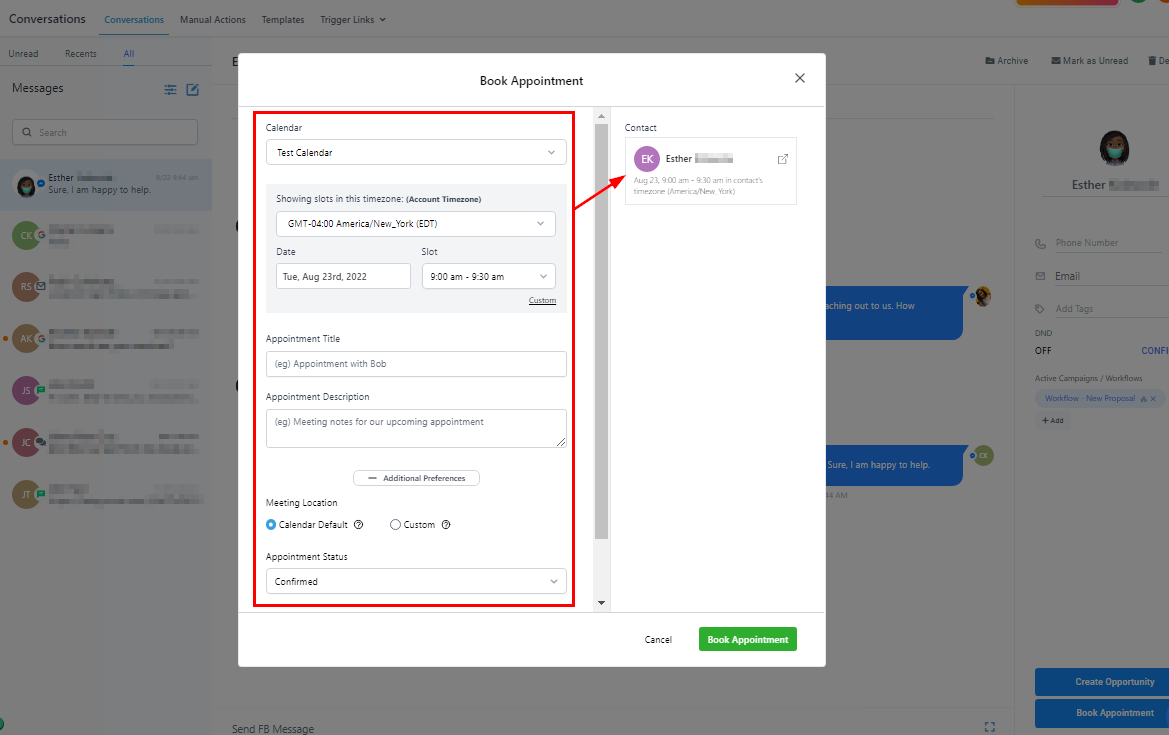
Once you click on the "Book Appointment" you will;
- Select the team's calendar you would like to assign this client's appointment to, then
- Choose the timezone, date, and time slot. You can decide to customize the Start and End times.
- Input the appointment title. Click on "Show Notes" to see the appointment description.
- Select the meeting location, you can either select Calendar Default or customize the location.
- Select the appointment status; Confirmed or Unconfirmed.
You can add the client to an opportunity here, just input the necessary info and click the "Add" button to save it.
Book Appointment
Once you click on the "Book Appointment" you will;
- Select the team's calendar you would like to assign this client's appointment to, then
- Choose the timezone, date, and time slot. You can decide to customize the Start and End times.
- Input the appointment title. Click on "Show Notes" to see the appointment description.
- Select the meeting location, you can either select Calendar Default or customize the location.
- Select the appointment status; Confirmed or Unconfirmed.
Was this article helpful?
That’s Great!
Thank you for your feedback
Sorry! We couldn't be helpful
Thank you for your feedback
Feedback sent
We appreciate your effort and will try to fix the article